
THE MEASUREMENTS
Because the foot is three-dimensional, any two-dimensional tool, like a ruler, can only approximate your true shoe size. Additionally, each style is built on a specific shoe last, so sizing can vary between designs.
Prepare the Following Items


Start taking the measurements.

Picture 1. Contour drawing

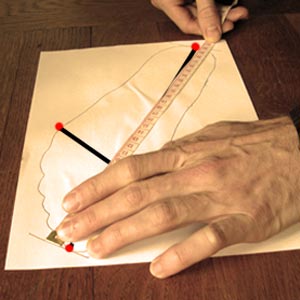
Picture 2. Tracing a line between the points of the longest and widest part of your feet
Picture 3. Measuring the lines in centimeters. Do not convert from inches to centimeters.
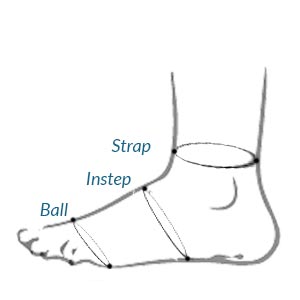
Picture 4. Extra measurements

Table 1. Measurements form

Picture 5. Arch Support
Step #1: Draw the contour of your feet
Place your right foot flat on a sheet of paper and put your full weight on that foot.
Stay balanced so you do not shift or wobble.
Both feet may rest on the floor as long as most of your weight is on the foot being traced.
Have another person trace the outline using a thin pen or pencil held vertically.
Then, do the same with the other foot.
Important
Do not trace your own foot because, as you bend to draw, you will put weight on your feet and change the size.
Do not lean over and watch as the person outlines your feet. By doing so, you will move your legs and put uneven weight on your feet.
Step #2: Find the longest and widest part of your foot
On each outline, draw a straight line from the heel to the longest toe (length)
and another across the widest part of the forefoot (width), as shown in the picture.
Measure those lines in centimeters and write the values on the same paper.
Repeat for your left foot and note your usual shoe size (US) for dancing shoes on the same paper.
Important
One foot may be longer than the other, so please send measurements for both feet.
Salamanca shoes will make both shoes to the larger size unless you specifically request different sizes for each foot.
Extra measurements
Ball (forefoot width): Measure the two widest bone-to-bone points across the forefoot. Hold the tape flat and allow the ends to meet without tightening.
Instep (height): Measure the highest part of your foot from one side to the other over the instep. This is important for men’s or closed-toe shoes. Ensure the tape meets without compressing.
Strap (above ankle): Measure the circumference just above the ankle. Let the tape meet comfortably without squeezing.
Arch support: Measure the arch height in centimeters and include a side-view photo of the foot. See picture #5.
Step #3: Send the pictures of the foot outline and measurements
Email custommadetangoshoes@gmail.com with:
Scans or clear photos of each foot outline (left and right).
All measurements in centimeters (length, width, ball, instep, strap, arch height).
A side-view photo and a short video of your feet if possible.
Your usual US shoe size and any foot conditions (flat foot, high instep, bunion, narrow/wide foot, etc.).
Any special requests (e.g., different sizes for each foot).
See table (1) for reference.
Before you send, confirm:
Someone else traced your foot while you stood with full weight on that foot (do not trace your own foot).
Do not lean over, shift your weight, or lose your balance while your foot is being traced.
The tracer held a thin pen or pencil vertically (90° to the paper) while tracing.
All measurements are recorded in centimeters (do not convert from inches or any other units).